


This page contains the setup documentation for the Austin BigCommerce theme by MAK Digital. Each section covers one area of the theme settings in your BigCommerce control panel.
It is part of the BigCommerce Theme Documentation. If you need help, see our BigCommerce support services.
Contents
Before You Start
Welcome
Austin is a BigCommerce Stencil theme designed for the firearms and sporting goods market, with a responsive, mobile-friendly design. It suits stores selling firearms, ammo, camping equipment, sporting goods and more.
The theme includes product displays by category, a mega menu for building a detailed navigation structure, product faceted filters (available for Pro and Enterprise editions), a newsletter popup, a side cart popup and product comparison.
Theme Features
Below are features you can find within Austin:
- Fully Responsive
- Mega Navigation
- Frontpage Slideshow
- Quick Add-to-Cart
- Product Comparison Table
- Complex Search Filtering
- Customizable Product Selector
- Cart Suggested Products
- High Res Product Images
- Product Filtering
- Product Showcase
- Persistent Cart
- One Page Check Out
- Product Videos
- Customized Check Out
- Saved Payment Methods
- Google Analytics Enhanced Ecommerce
- Storefront CSRF Protection
- PayPal Support
Theme Support
Please review this documentation first. It covers many common setup questions. Follow the steps in each section carefully from start to finish to set up the elements in your Austin theme.
If you need help with your BigCommerce store or theme, see our BigCommerce support services.
Installation
Installation Process
For installation instructions, please read this BigCommerce article: The BigCommerce Themes Marketplace.
Uploading Images
- Go to Storefront > Image Manager, then click Upload Images.
- In the popup that appears, click Choose File (or Browse) and select an image from your computer.
- Repeat Step 2 for each additional image you want to upload. When you are finished, click Upload.
- After processing, new images will appear under Image Manager.
Grabbing Image URL Path
Once your image is uploaded, follow these steps to grab the proper image URL path:
- Go to Storefront > Image Manager.
- Click on the image you just uploaded to View Full Size.
- Once the full-size image opens, grab the image path by copying the entire URL from your browser’s address bar.
- Once you have the path, paste it into the field where it is needed.
Header and Footer
Header Settings
Changing Company Tag
To update the company tag, navigate to Storefront > Theme > Customize > Theme Styles > Global > Company Tag.
Note: This tag is crucial for SEO purposes, as it controls the H1 tag of the homepage. You will not see any visual changes reflected in the design, but it impacts how search engines view your store.
Changing Phone Number
To update the phone number displayed on your store, go to Settings > Store Profile.
Note: Doing this will update the phone number that is displayed on both the header and footer.
Changing Logo
To update the company logo on your header, head to Storefront > Logo. The recommended logo size for this theme is 250px by 70px, optimized for the best display. If you’re using a different size, make sure it maintains the same aspect ratio.
Note: This only updates the logo in your header. It does not change the footer.
Save and Publish
After making all the necessary changes to your header settings, don’t forget to save your theme and publish it to apply the updates to your store.
Store Logo
Uploading a Custom Image Logo
To upload a custom image as your store logo:
Navigate to Storefront > Logo > Upload a custom image to use as your logo.
For more details, refer to the BigCommerce article on uploading a custom logo.
Note: This only updates the logo in your header. It does not change the footer.
Using Text as Your Logo
If you prefer to use text for your logo:
Navigate to Storefront > Logo > Enter text to display as your logo.
Note: This only updates the logo in your header. It does not change the footer.
After making your changes, don’t forget to save and publish your theme.
Newsletter Section
To display the newsletter section, go to Storefront > Theme > Customize > Theme styles > Footer and check the “Show Newsletter” checkbox.

To view the changes, scroll down to the end of the page to see the “subscribe to newsletter” option.

To find newsletter subscribers, go to Storefront > Marketing > Email Marketing > Subscribers.
After making the necessary changes, don’t forget to save your theme and publish it to apply the updates to your store.
Social Media Icons

To enable the Social Media Icons section on your store, follow these steps:
- Go to Storefront in your BigCommerce admin panel.
- Select Theme > Customize > Theme > Header & Footer.
- Scroll down to find the checkbox labeled “Show Social Section”.

After making your changes, don’t forget to save and publish your theme.
Setting up each Social Media link
- Go to Storefront > Social Media Links.
- Add the URLs for your social media profiles in the corresponding fields.

Once enabled and set up, the Social Media Icons section will appear in your store’s footer, linking to your social media profiles.
After making your changes, don’t forget to save and publish your theme.
Contact Information
Changing Email Address in Footer
To update the email address displayed in the footer, follow these steps:
- Go to Storefront in your BigCommerce admin panel.
- Select Theme > Customize > Theme Styles > Global.
- Locate the Email Address field and update it with your preferred email address.

Changing Address in Footer
To update the address displayed in the footer:
- Go to Settings in your BigCommerce admin panel.
- Select Store Profile.
- Update your store’s address with the new information.

Changing Phone Number in Footer
To update the phone number displayed in the footer:
- Go to Settings in your BigCommerce admin panel.
- Select Store Profile.
- Update your store’s phone number with the new information.

After making your changes, don’t forget to save and publish your theme.
Gift Certificate
Enabling Gift Certificates
To display a Gift Certificate image in your footer, follow these steps:
First, enable Gift Certificates by navigating to Marketing > Gift Certificates in your BigCommerce admin panel.

Uploading Your Gift Certificate Image
After enabling Gift Certificates:
- Create an image for your Gift Certificate display.
- Upload the image via Image Manager.
The recommended size of the gift certificate image is 450px by 240px.
After making your changes, don’t forget to save and publish your theme.
Copying the Image URL Path
- After uploading the image, click on the image thumbnail to open it in full size.
- Copy the entire URL from your browser’s address bar. This is the image path that you’ll need to enter in the “Url for Gift Certificate Image” field.

Adding the Image to the Footer
Next, add the image to your footer:
- Go to Storefront > Theme > Customize > Theme Styles > Header & Footer > Footer.
- Enter your image URL in the field labeled “Url for Gift Certificate Image”.

We recommend using an image with the dimensions 450px by 240px. In the Image width and Image height fields, enter the corresponding dimensions to ensure the image displays correctly.
After making your changes, don’t forget to save and publish your theme.
Payment Methods
Enabling the Payment Methods Section
To display the payment methods in your store’s footer, follow these steps:
- Go to Storefront in your BigCommerce admin panel.
- Select Theme > Customize > Theme Styles > Header & Footer.
- Check the checkbox labeled “Show Payments Section” to enable the display of payment methods.

Displaying Specific Payment Method Images
To display specific images for the payment methods accepted in your store:
- Go to Storefront > Theme > Customize > Theme Styles > Header & Footer.
- Check the boxes next to all the payment methods that apply to your store.

After making your changes, don’t forget to save and publish your theme.
Footer Display Settings
Display Popular Brands in Footer
To show popular brands in your store’s footer, follow these steps:
- Add your brands under Products > Brands.
Assign the brands to the appropriate products by going to Products > View products > Click on product of choice.
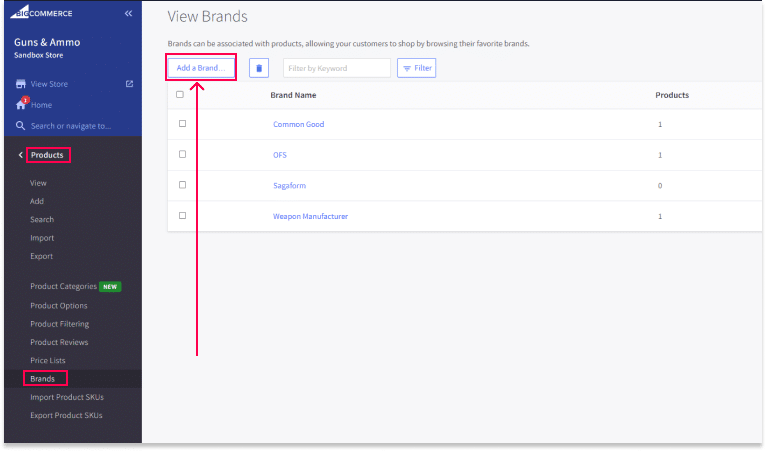
- Go to Theme > Header & Footer and check the checkbox labeled “Show brands in footer”.


Please note that updating the logo may take up to 30 minutes or longer to appear in the footer.
After making your changes, don’t forget to save and publish your theme.
Show Company Copyright Notice
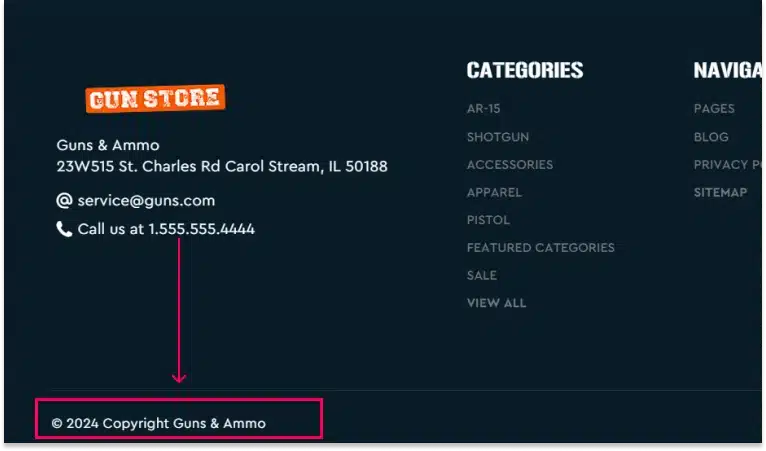
To display the company copyright notice in your footer:
- Go to Storefront > Theme > Customize > Theme Styles > Header & Footer.
- Check the checkbox labeled “Show copyright current year and store name”.
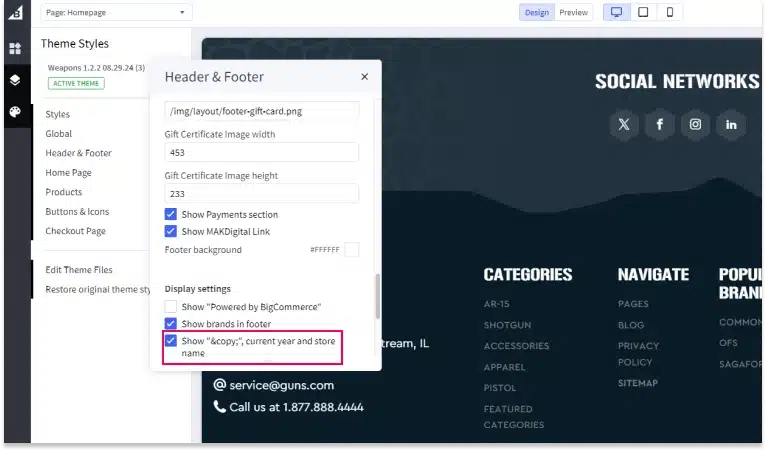
After making your changes, don’t forget to save and publish your theme.
Show Powered by BigCommerce Notice
To display the “Powered by BigCommerce” notice in your footer:
- Go to Storefront > Theme > Customize > Theme Styles > Header & Footer.
- Check the checkbox labeled “Show Powered by BigCommerce”.
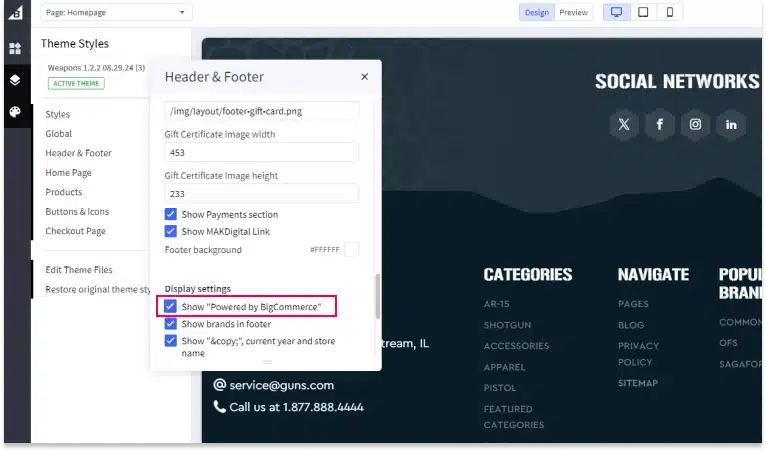
After making your changes, don’t forget to save and publish your theme.
Show MAK Digital Link
To display the MAKDigital link in your footer:
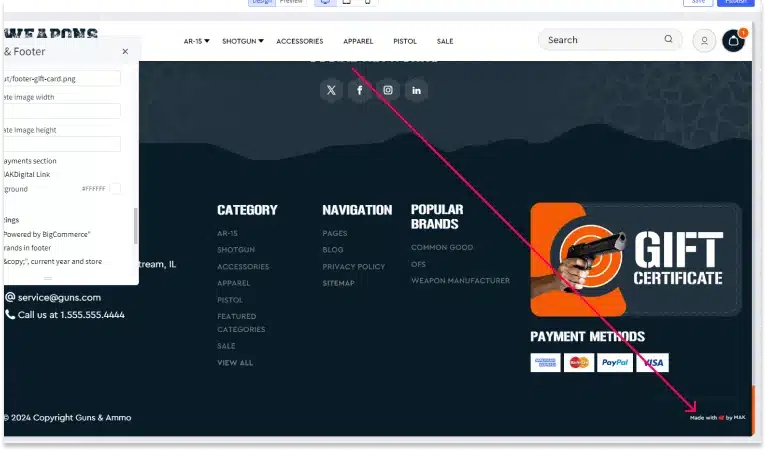
- Go to Storefront > Theme > Customize > Theme Styles > Header & Footer.
- Check the checkbox labeled “Show MAKDigital Link”.
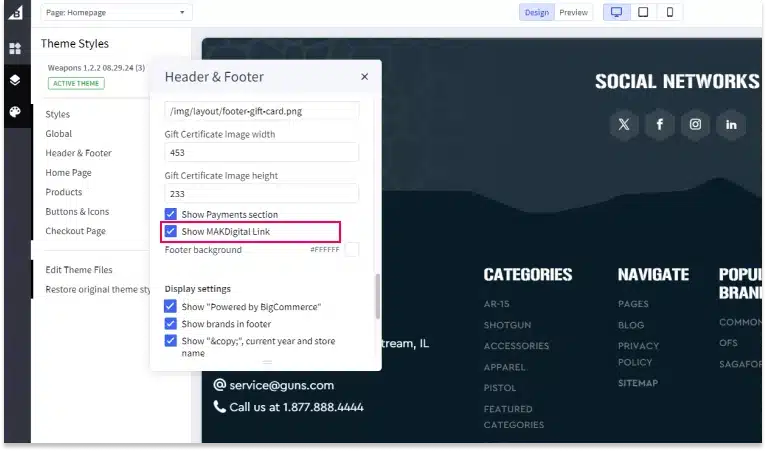
After making your changes, don’t forget to save and publish your theme.
Change Footer Labels
To modify the labels within the footer, such as “Navigate”, follow these steps:
- Go to Storefront in your BigCommerce admin panel.
- Select Theme > Advanced > Edit Theme Files.
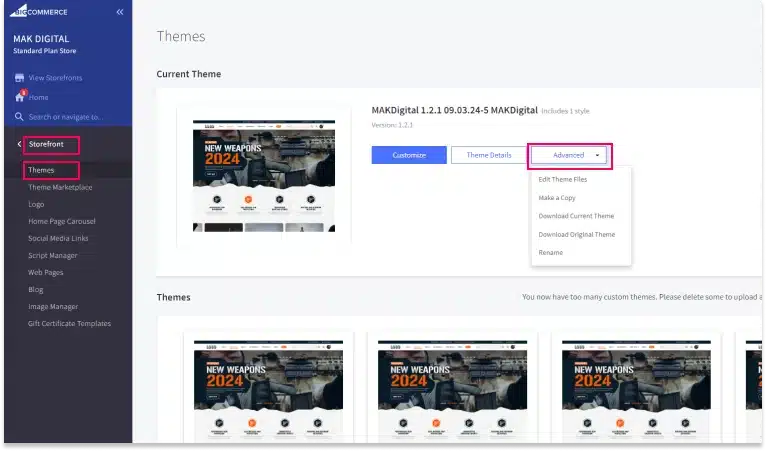
Once you are in the Edit Theme Files section:
Navigate to lang >
en.json.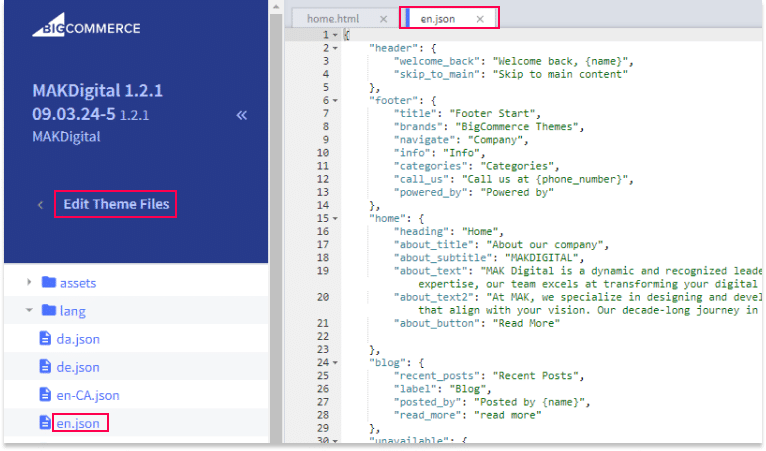
Go to the “footer” section.
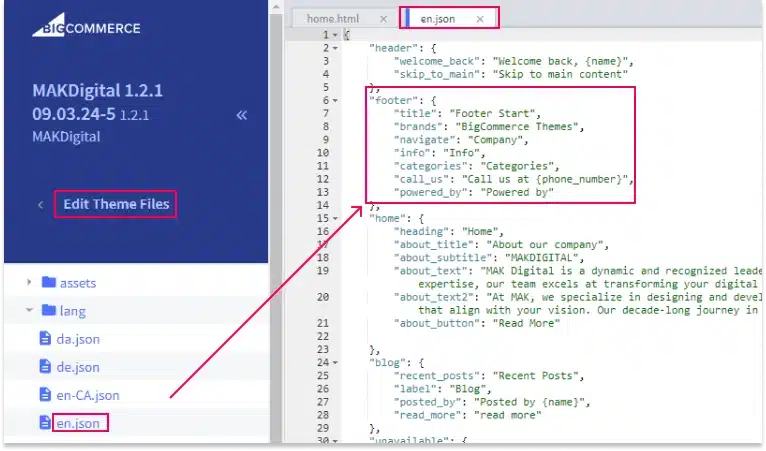
- Rename the labels to your desired text.

Save and Publish
After making all the desired settings changes to your theme, it’s important to save and publish those changes to ensure they take effect on your live store.
- Once you have completed your customizations, locate the Save button in the Theme Editor.
- Click Save to store your changes.
- After saving, click Publish to apply the changes to your live storefront.
Your theme updates will now be visible on your live site.
Homepage
Carousel
To change the Carousel Content on the Home Page navigate to Storefront > Home Page Carousel:

To make part of the text orange within the heading, separate words by “///” (Example: “New Weapons ///2024”). The result is shown below.

The best image size for the carousel display is 1920px by 800px. All carousel images should be the same size and keep the same size ratio.
You can have up to 5 banners in your carousel. Each banner can contain different images, headings, and links, allowing you to showcase various products or promotions.
Customize the carousel by changing the background colors, text colors, and more under the Carousel Settings section. These options allow you to match the carousel design with your overall store aesthetic.

Carousel Control Settings
To control the Carousel go to Page Builder > Theme Styles > Home Page > Carousel, below you will find the following settings:
- Show carousel: Check this option to display the carousel on the homepage.
- Allow image to stretch on large screens: Enable this setting to ensure the image stretches and fits larger screen sizes without distortion.

Save and Publish: After making all settings changes, make sure to save your theme and publish it.
Benefits Section

Show Benefits Section
To display the Benefits section on your home page:
- Go to Storefront > Theme > Customize > Theme Styles > Home Page > Benefits.
- Select the number of benefits you want to show. You can create up to 4 subsections within this area.

Create images for all of your store’s benefits. The recommended size is 150px by 150px.
Benefit 1 Image URL
To set the image for the 1st benefit:
Enter the image URL for the 1st benefit in the “Benefit 1 Image URL” field.

Benefit 1 URL
To set the link for the 1st benefit:
Enter the URL you want this section to link to in the “Benefit 1 URL” field (e.g., “/about-us/”).

Benefit 1 Title
To set the title for the 1st benefit:
Enter the title for the 1st section in the “Benefit 1 Title” field (e.g., “Responsible Gun Ownership”).

Benefit 1 Text
To set the text for the 1st benefit:
Enter the text for the 1st section in the “Benefit 1 Text” field (e.g., “Sed ut perspiciatis unde omnis iste natus error sit voluptatem accusantium doloremque”).

Repeat for All Benefits
Repeat the above steps for all benefits you want to display on your store (up to 4).
Under “Benefits image width” and “Benefits image height”, enter the dimensions for the images you created. All images for benefits should be the same size.
Save and Publish
After making all your settings changes, be sure to save your theme and publish it to apply the changes to your live site.
Featured Categories
Show Featured Categories
To display Featured Categories on your homepage:
- Go to Storefront > Theme > Customize > Theme Styles > Home Page.
- Check the checkbox labeled “Show featured categories”.

Create Main Category
To create a main category for your Featured Categories:
- Create a main category in your store, and name it “Featured Categories” or a name of your choosing.
- Go to Storefront > Theme > Customize > Theme Styles > Home Page > Featured Category Name.
- Enter the exact name of the category you created.
- Save your changes.

Create Subcategories
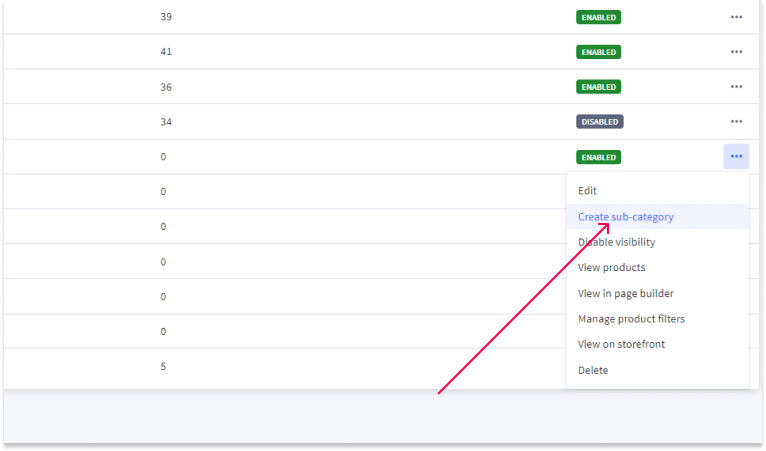
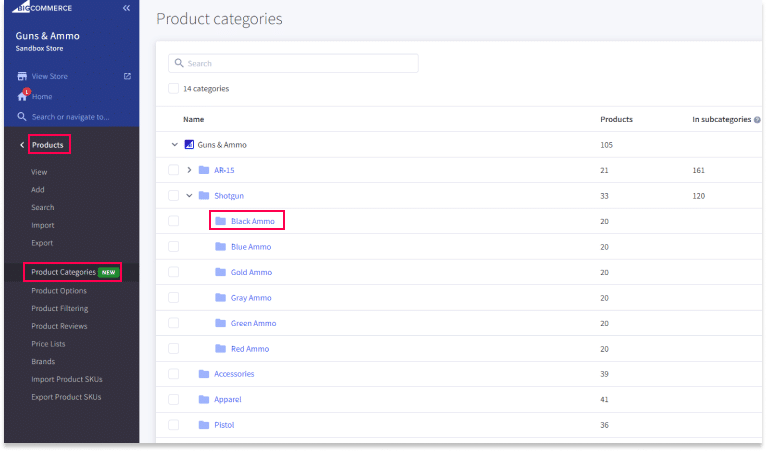
To add subcategories within your Featured Categories, go to Products > Product Categories > Featured Categories.
To add subcategories to product categories, you need to be on the Product Categories page. Once you have identified the category you want to add a subcategory to, select the three dots on the far right of the page. From the drop-down menu that opens, select “Create sub-category”.
- To match the theme demo, each subcategory needs an image assigned to it. We recommend an image size of 600px by 500px, or a size that maintains a similar aspect ratio.

Instructions for Adding Images to Subcategories
To add images to your subcategories, follow these steps:
- Go to Products > Product Categories.
Select the subcategory of your choice by clicking on it.
- Scroll down to the section labeled Category Image.
- To upload an image, you can either Drag & Drop the image file or click Choose File to browse and upload the image from your computer.


Save and Publish
After making all your settings changes, be sure to save your theme and publish it to apply the changes to your live site.
Callout Banner
Show Callout Banner
To display a callout banner below the Featured Categories section:
- Navigate to Storefront > Theme > Customize > Theme Styles > Home Page.
- Check the checkbox labeled “Show callout banner”.

Callout Banner Main Text
To set the main text for the callout banner:
- Navigate to Storefront > Theme > Customize > Theme Styles > Home Page.
- Locate the field labeled “Callout banner main text”.
- Enter the text you want to display as the large text within the banner (e.g., “NEW TO GUN BUYING? WE CAN HELP”).

Callout Banner Button Text
To set the text for the button within the callout banner:
- Navigate to Storefront > Theme > Customize > Theme Styles > Home Page.
- Locate the field labeled “Callout banner button text”.
- Enter the text you want to display on the button (e.g., “Contact us”).

Callout Banner URL
To set the URL where the callout banner will link:
- Navigate to Storefront > Theme > Customize > Theme Styles > Home Page.
- Locate the field labeled “Callout banner URL”.
- Enter the URL you want the banner to link to (e.g., “/contact-us/”).

Save and Publish
After making all your settings changes, be sure to save your theme and publish it to apply the changes to your live site.
Featured Products
Show Featured Products
To display featured products on your store:
Go to Products > View in your BigCommerce admin panel.
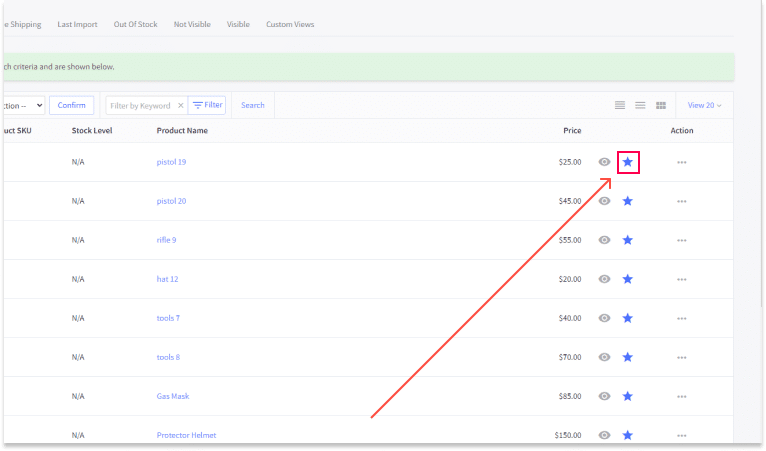
For the full list of featured products, select “Featured” at the top of the screen.
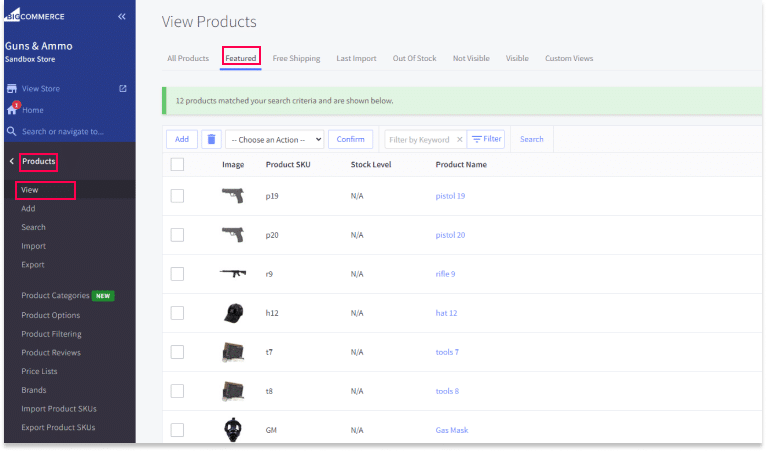
- Find the products you want to feature and mark them with a star by clicking the star icon next to the product name.


Save and Publish
After marking your featured products, make sure to save your theme and publish it to apply the changes to your live site.
Large Banner with Product
Show Large Banner with Product
To display a large banner with a product, follow these steps:
- Go to Storefront > Theme > Customize > Theme Styles > Home Page.
- Check the checkbox labeled “Show large banner with product”.

Banner Background Path
To set the background image for your large banner:
- Add a path to the image you want to use as the main background for this banner. First, create the image using the recommended dimensions for this banner, which are 1920px by 1000px.
Upload the image via Storefront > Image Manager.
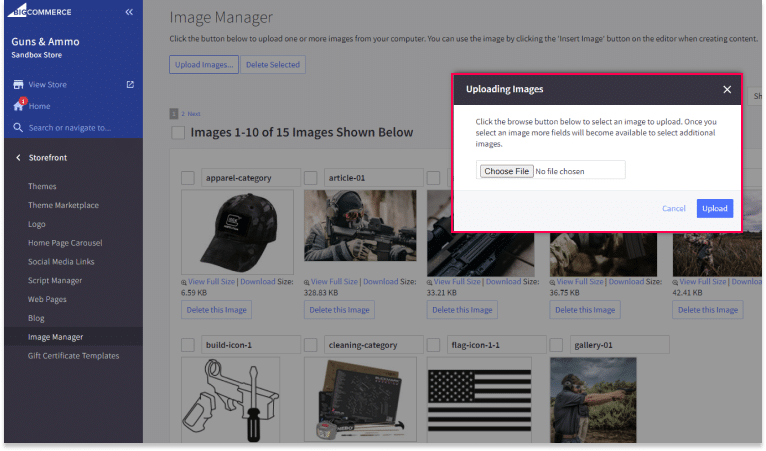
After uploading, click on “View Full Size” to display it in your browser.
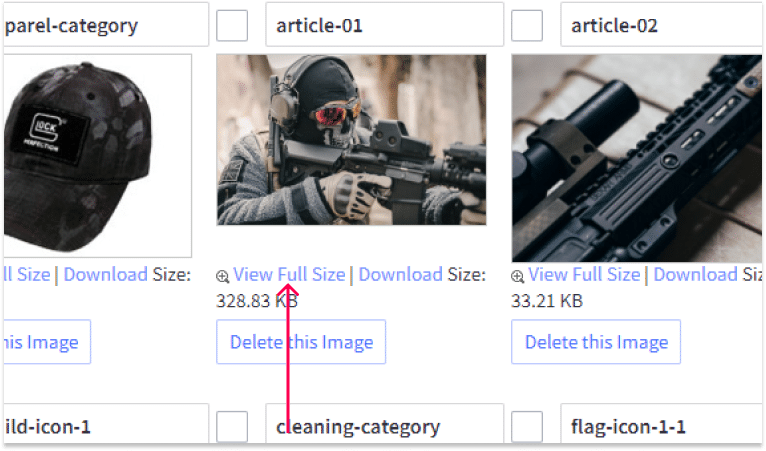
Copy the full URL from your browser.
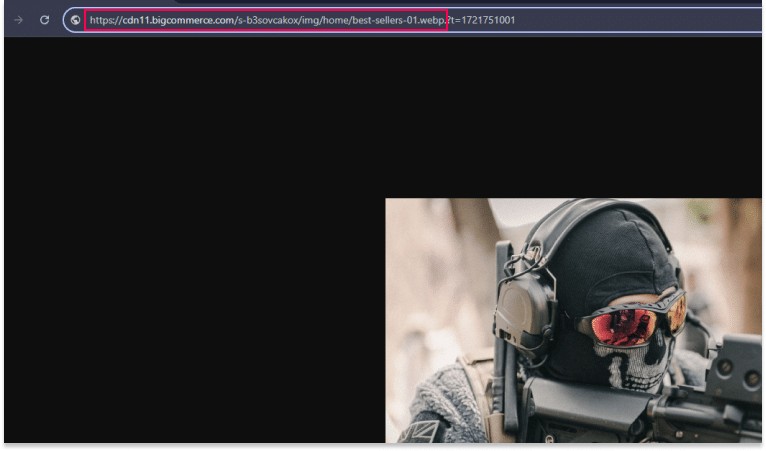
- Then paste it into the “Path for the banner background” textbox which you can access from Storefront > Theme > Customize > Theme Styles > Home Page > Scroll down to “Path for the banner background”.


Large Banner Title
To set the title for your large banner:
- Go to Storefront > Theme > Customize > Theme Styles > Home Page and scroll down.
- Enter your desired title in the “Large banner title” field (e.g., “WAREHOUSE CLEARANCE”).

Large Banner Subtitle
To set the subtitle for your large banner:
- Go to Storefront > Theme > Customize > Theme Styles > Home Page and scroll down.
- Enter your desired subtitle in the “Large banner subtitle” field (e.g., “UP TO 35% OFF ALREADY LOW PRICES!”).

Large Banner URL
To set the URL for your large banner:
- Go to Storefront > Theme > Customize > Theme Styles > Home Page and scroll down.
- Enter the URL you want to link to from this banner in the “Large banner URL” field (e.g., “/categories/?sort=bestselling”).

Product Label
To set the product label that appears on top of the product image:
- Go to Storefront > Theme > Customize > Theme Styles > Home Page and scroll down.
- Enter the text you want to display in the “Product label” field (e.g., “BEST SELLERS”).

Button Text
To set the text for the button within the banner:
- Go to Storefront > Theme > Customize > Theme Styles > Home Page and scroll down.
- Enter the desired text in the “Button text” field (e.g., “Shop Now”).

Small Image URL
To set the image for your product:
- Go to Storefront > Theme > Customize > Theme Styles > Home Page and scroll down.
- Upload the small image via Storefront > Image Manager, and follow the same steps as for the large banner image.
- Copy the full URL from your browser and paste it into the “Small image URL” field (e.g., an image of a product).

Small Image Height and Width
To set the height and width for the small image:
- Go to Storefront > Theme > Customize > Theme Styles > Home Page and scroll down.
- Enter the width and height values in pixels in the respective fields. This is important for better accessibility performance.

Save and Publish
After making all your settings changes, be sure to save your theme and publish it to apply the changes to your live site.
New Products Carousel
Display New Products
To display new products under the large banner:
- Go to Storefront > Theme > Customize > Theme Styles > Home Page.
- Select the number of new products you want to display under the “Number of New Products” field.
- If you wish to disable this section, you can set the dropdown to “Disable”.
Note: If new products are not added to the system within 30 days, this section will not populate.

Save and Publish
After making all your settings changes, be sure to save your theme and publish it to apply the changes to your live site.
About Us Section
Show About Company Section
To display the About Company section on your home page:
- Go to Storefront > Theme > Customize > Theme Styles > Home Page.
- Check the checkbox labeled “Show about Company Section”.

About Company Image
To set the image for the About Company section:
- Enter the path to the image URL you have previously uploaded via Image Manager.
- For optimal display, we recommend an image size of 1000px by 600px.

About Company URL
To set the URL for the About Company section:
Enter the URL you want to link to from this section in the “About Company URL” field (e.g., “/about-us/”).

About Company Title
To set the main title for the About Company section:
Enter your desired title in the “About Company Title” field (e.g., “about our company”).
About Company Subtitle
To set the subtitle for the About Company section:
Enter your desired subtitle in the “About Company Subtitle” field (e.g., “Weapons”).

About Company Button Text
To set the text for the button in the About Company section:
Enter your desired button text in the “About Company Button Text” field (e.g., “Read More”).

Main Text
To set the main text for the About Company section:
- Go to Storefront > Theme > Customize.
- Click the Design Tab.
- Scroll down to About Our Company.
- Enter your desired text into the text box.

Save and Publish
After making all your settings changes, be sure to save your theme and publish it to apply the changes to your live site.
Blog Section
Show Blog Section
To display the Blog section on your blog page:
- Go to Storefront > Theme > Customize > Theme Styles > Blog > Scroll down.
- Check the checkbox labeled “Show Blog Section”.

Blog Title
To set the title for the Blog section:
- Go to Storefront > Theme > Customize > Theme Styles > Home Page.
- Scroll down to the “Blog Title” field.
- Enter your desired title for the blog section (e.g., “Our Latest Posts”).

Blog Buttons
To customize the buttons for your Blog section:
- Go to Storefront > Theme > Customize > Theme Styles > Home Page.
- Scroll down to the “Blog Buttons” section.
- Enter the label for the buttons in the “Blog Buttons” field (e.g., “Read More”).

Save and Publish
After making all your settings changes, be sure to save your theme and publish it to apply the changes to your live site.
Product Settings on Homepage
Show Featured Products
To display featured products on your homepage:
- Go to Storefront > Theme > Customize > Theme Styles > Home Page.
- In the “Number of Featured Products” section, select the number of products you want to display from the dropdown menu.
- If you wish to disable this section, select “Disable” from the dropdown.
Please note that featured products are manually marked within your BigCommerce product settings by clicking the star icon next to the product you want to feature.

Show Popular Products
Popular products are automatically pulled based on sales data. If no products have been sold recently, this section will not populate.
- Navigate to Storefront > Theme > Customize > Theme Styles > Home Page.
- In the “Number of Popular Products” section, choose the number of products to display from the dropdown menu.
- To disable this section, set the dropdown to “Disable”.

Show New Products
To display new products under the large banner:
- Go to Storefront > Theme > Customize > Theme Styles > Home Page.
- Select the number of new products you want to display from the dropdown in the “Number of New Products” section.
- If you wish to disable this section, set the dropdown to “Disable”. Please note that if no new products have been added to your inventory within the last 30 days, this section will not populate.

Save and Publish
After making all your settings changes, be sure to save your theme and publish it to apply the changes to your live site.
Products
Common Settings
Accessing Product Display Settings
To access and adjust your product display settings, follow these steps:
Go to Storefront > Theme > Customize > Theme Styles > Products.
Within this section, you’ll find various options to control how products are presented on your store. Below are some key features you can adjust:
Product Quickview
Show Quickview Button on Product Cards: Enable this option to allow customers to view product details quickly from category pages without navigating to the product page.
Number of Products Displayed
Number of Products per Page: Customize how many products are displayed on category pages, brand pages, and search results. You can adjust this based on the browsing experience you’d like to offer (e.g., 12, 16, or more products per page).
Product Sales Badge
Product Sales Badge Settings: Control the display and text for sale badges that appear on discounted products. You can choose the placement and customize the label (e.g., “On Sale,” “50% Off”).
These settings allow you to tailor your store’s product presentation, ensuring a smoother and more visually appealing shopping experience. Once all changes are made, remember to Save and Publish your theme to apply the updates across your site.
Product Display Settings
Follow these steps to access and modify your product display settings:
Go to Storefront > Theme > Customize > Theme Styles > Products > Product Display Settings.
Show Quickview Button on Product Cards
The Quickview feature allows customers to quickly access product details without leaving the category page. To enable this feature:
- Scroll down to the section titled “Show quickview button on product cards”.
- Check the box next to Show quickview button on product cards to display the quickview button on each product card within the category section.
Selecting the Number of Products to Display
You can adjust the number of products shown on the category page, brand page, search results page, and product pages. Here’s how to do it:
- Within the Product Display Settings section, locate the dropdown menu under each page type (e.g., category page, brand page, search results page).
- Select the number of products you want to display per page. Options typically range from 12 to 16 products, but you may have other options depending on the theme.
- Choose the desired number for each page type, allowing you to customize the shopping experience based on the type of page and the volume of products.
After you have made all the necessary changes to the product display settings, remember to Save and Publish your theme to apply the updates across your store.
Product Sales Badges
Instructions for Accessing Product Sales Badge Settings
To customize the appearance and functionality of the product sales badge, follow these steps:
- Go to Storefront and select Theme > Customize.
- In the Theme Styles menu, scroll down and locate the Products tab, where you will find Product sale badges. This is where you can control various settings for the badge.
Changing Text in Product Sales Badge Label
To customize the text that appears on the product sales badge, follow these steps:
- Go to Storefront and select Theme > Customize.
- Go to the Theme Styles menu and select Products.
- Scroll down to the Product Sales Badge section.
- In the Product sale badge label field, enter the desired text you want to display on the product sales badge (e.g., “On Sale,” “50% Off”).
- Preview your changes to ensure they look as intended.
- Once satisfied, click Save and Publish to apply the changes to your store.
Changing the Placement of the Product Sales Badge
To change where the product sales badge appears on product images, use the Show Product Sales Badge dropdown menu by following these steps:
- Go to Storefront and select Theme > Customize.
- In the Theme Styles menu, navigate to the Products section.
- Scroll down to the Product Sales Badge settings.
- Locate the Show Product Sales Badge dropdown.
- From the dropdown menu, choose the placement for the badge: Top Left, Diagonal, Burst or None.
- Preview your changes to ensure the badge is positioned correctly on the product images.
- Once you’re satisfied with the placement, click Save and Publish to update your live store.
Utility Pages
Contact Us Page
Steps to Edit Your Contact Us Page
- Navigate to Storefront > Web Pages.
Select Contact Us from the list of web pages.
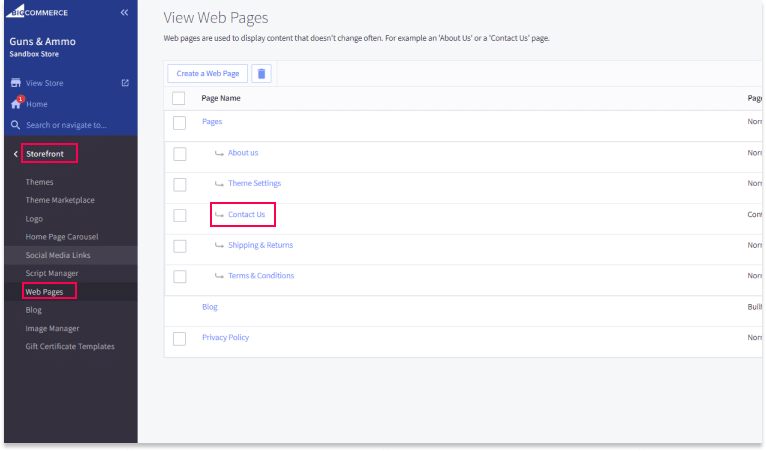
In the editor, you can modify your content directly or paste the HTML code of your text for your “Contact Us” page.
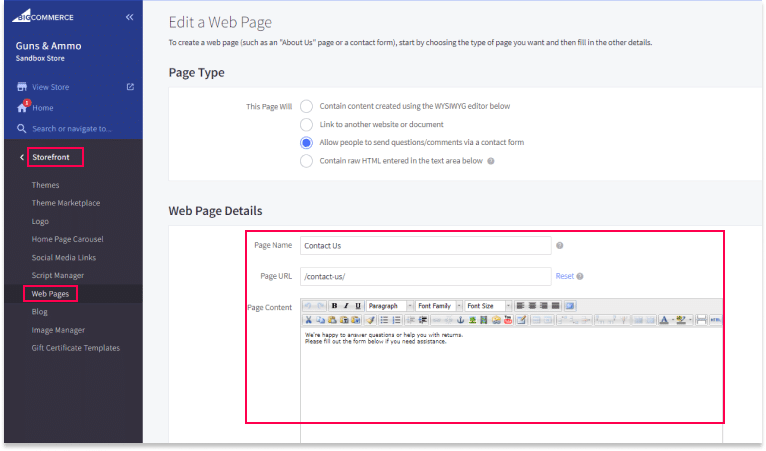
- After making your changes, ensure to save your updates to reflect them on your live site.


Blog Page
- Go to Storefront > Blog > Create a New Blog Post. In your BigCommerce dashboard, select Storefront, go to Blog and choose Create a New Blog Post to start a new blog entry.
- In the New Blog Post Panel, locate the Body section. Click on the HTML button to open the HTML Source Editor where you can input your blog content using HTML.
- If you prefer not to use HTML, you can simply type your blog content in the text box provided. The editor lets you add and format regular text without entering HTML. You can adjust font sizes, colors and other formatting options directly in the text editor.
Once you’ve finished entering and formatting your content, make sure to save your changes to publish the blog post on your website.
FAQs Page
How to Create an FAQs Page
- Navigate to Storefront > Web Pages in your BigCommerce dashboard.
- In the Create a Web Page section, enter FAQs as the page name.
- Under Advanced Options, select the template layout file named
faqs-layout.
How to Edit the Content of the FAQs Page
- Go to Storefront > Web Pages > FAQs Page.
- Click on the HTML Source Editor to access the source code for detailed customization.
- Input the desired content into the editor.
- Save your changes to update the FAQs page with the new content.
Creating an FAQs Page Without Using HTML
If you don’t want to use HTML, you can also simply type your content into the text editor. The BigCommerce editor allows for easy text formatting, so you can create your FAQs page with headings, lists, and other formatting options without needing to write any HTML code.
After you’ve added the content, make sure to save your changes to apply them to your live site.
Common Austin Theme Questions
How do I customize the Austin theme for my store?
Go to your BigCommerce dashboard and navigate to Storefront > My Themes > Customize. From there, you can access the Theme Editor to make changes to various aspects of your store, such as colors, fonts and layout.
Can I add custom scripts or integrate third-party apps with the Austin theme?
Yes. You can add custom scripts or integrate third-party apps by using the Stencil File Editor. It lets you access and edit your theme’s code directly without installing the Stencil CLI. It is recommended for users with experience in HTML/CSS and Handlebars. See Editing Theme Files.
How do I update the Austin theme?
Go to Storefront > My Themes in your BigCommerce dashboard. If an update is available, you will see an option to update your theme. Always back up your current theme before making any updates to avoid losing customizations.
Does the Austin theme support product faceted filters?
Yes. The Austin theme includes product faceted filters, which make it easier for customers to narrow down their product search. This feature is available only for Pro and Enterprise editions.
Can I customize the checkout page with the Austin theme?
Yes. Go to Storefront > My Themes > Customize. In the Page Builder, select Theme Styles and click Checkout Page to make adjustments.
How do I manage the side cart display in the Austin theme?
The side cart display can be managed through the theme customization options. You can enable or disable the side cart and adjust its settings to match your store’s design and functionality needs.
About Us Page
Steps to Edit Your About Us Page
- Navigate to Storefront > Web Pages.
- Select About Us from the list of web pages.
- In the editor, you can modify your content directly or paste the HTML code of your text for your “About Us” page.
- After making your changes, ensure to save your updates to reflect them on your live site.

Privacy Policy Page
Steps to Edit Your Privacy Policy Page
- Navigate to Storefront > Web Pages.
Select Privacy Policy from the list of web pages.
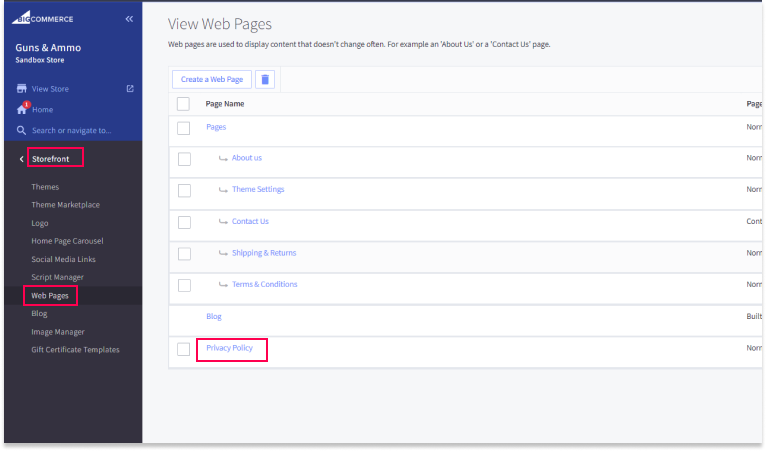
In the editor, you can modify your content directly or paste the HTML code of your text for your “Privacy Policy” page.
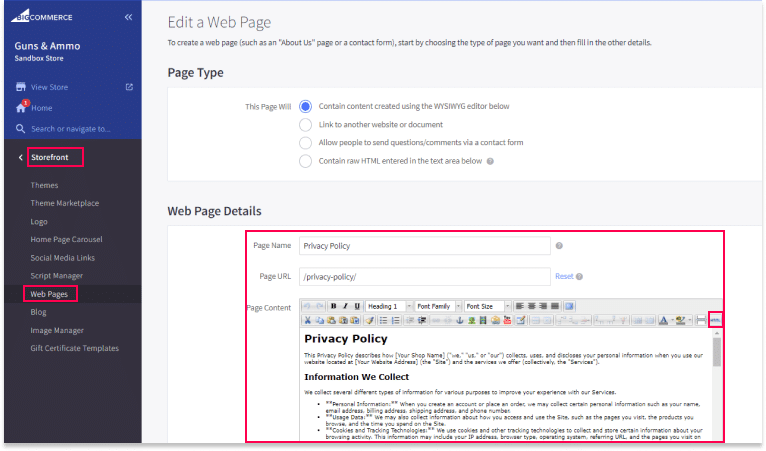
- After making your changes, ensure to save your updates to reflect them on your live site.

Editing Theme Files
Intro to Editing Theme Files
If you need to make quick adjustments or add custom scripts to the Austin theme, the Stencil File Editor lets you edit your theme directly from your browser, without installing the Stencil CLI (command-line interface). It is useful for minor tweaks that can’t be handled through the Theme Editor, or for adding functionality through custom scripts.
The following guide will walk you through the essential steps to access and edit Stencil-based theme template files for the Austin theme, allowing you to modify HTML/CSS directly within the in-browser editor.
Please note that using this feature requires a solid understanding of HTML, CSS, and Handlebars. For more extensive design changes or the development of a new theme, we recommend utilizing the Stencil CLI, which offers full access to all theme files and is better suited for major customizations.
Accessing Theme Editor Files
To start editing the HTML/CSS files in the Theme Editor, you’ll need to first create a copy of your theme. Follow these steps to install and duplicate your theme:
- Navigate to Storefront Design > My Themes. If your store is new, you might need to go to Channel Manager > Edit Storefront Settings > Themes, then click on the thumbnail image of your theme.
- From the Theme Options drop-down menu, select Make a Copy.
- You will be asked to name your theme copy. Enter a Theme Name of your choice, then click Save a Copy.
- The theme copy process will begin, and it may take a few seconds to complete. Once done, you can start editing the duplicated theme without affecting your live store.
Editing Your Theme File
When you select “Edit Theme Files,” the preview panel is replaced with the theme’s underlying code. On the left side of the tab, you’ll see the theme’s files organized in a tree structure of nested folders. Certain files and directories are hidden from view, as they should only be modified by the original theme developer. To access and edit these hidden files, you’ll need to use the Stencil CLI.
Theme Files
The folders and files that make up your theme are displayed here. Click on a blue folder to open it, or click on a blue .html or .scss file to edit its contents. Files that are greyed-out can only be modified using the Stencil CLI, although some greyed-out files can be viewed in this editor.

Code Panel
This is where you can edit the code of the selected file. The editor is equipped with features such as color-coded elements for easy identification and auto-suggestions for HTML as you type. It also supports Undo and Redo functions.

Preview
The preview pane will display a live preview of your store based on your last saved changes. This allows you to see how your edits will appear in real-time.

Saving Your Work
- Save File: This option saves the currently open file and recompiles the theme to apply your changes.
- Save All Files: This option saves all open files and recompiles the theme.
The file editor supports a mix of HTML, Handlebars statements, SCSS, and JavaScript tags within your theme’s template files, offering flexibility for comprehensive theme customization.
Saving Your Theme Files
Once you click the Save File or Save All Files button, the system will reassemble and package your theme files with the recent changes you made. Once this process is complete, you can preview the updated theme and decide whether to apply it to your store. The time required for saving and assembling will depend on the complexity and volume of the edits made.
Adding New Theme to Storefront
- Once you’re satisfied with your changes, click Save to package the updated theme.
- Go to Storefront > Themes, and scroll down to view your list of themes.
- Select the theme that you copied and modified.
- Choose the layout you want to use, then click Apply to activate it.

Finally, check your storefront to ensure the changes have been successfully implemented.
Knowledge Base
For complete BigCommerce documentation and support, please refer to the BigCommerce Knowledge Base.
Restrictions
The following features are not accessible when using the Edit Theme Files option:
- You cannot modify asset files such as fonts, .SVG files, or other image types.
- Editing configuration files like
config.jsonorschema.jsonis not possible, although their contents can be viewed. - The File Editor allows a maximum of 10 files to be open at the same time.
- JavaScript files cannot be edited within this editor.
- Concurrent editing is not supported; only one editor session should be open for a store at any given time.
Modification Log
- Weapons 1.2.2: 08.29.24
- Weapons 1.2.1: 08.1.24-3
Blog
Blog Settings
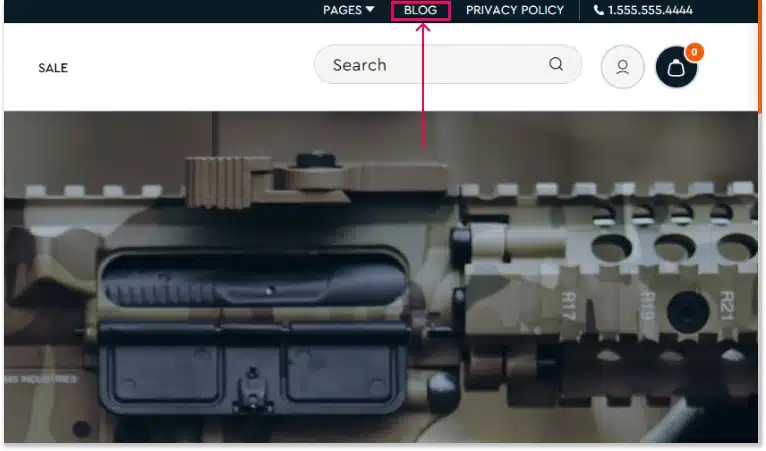
To access blog settings for the blog page, go to the Blog Page section located in the right corner between the Pages and Privacy Policy sections.
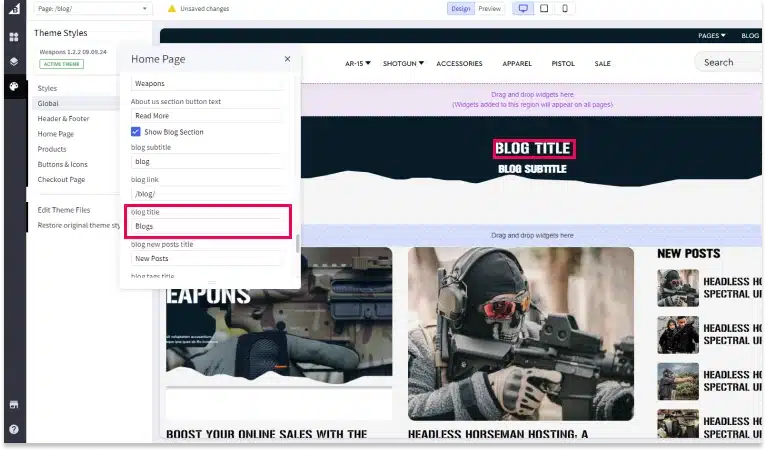
Blog Title
To set the title for the Blog section:
- Go to Storefront > Theme > Customize > Theme Styles > Home Page > Scroll down.
- Enter your desired title in the “Blog Title” field.
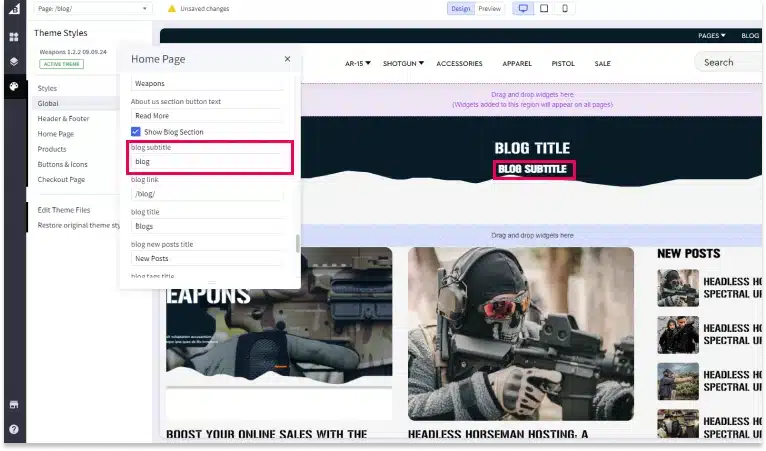
Blog Subtitle
To set the subtitle for the Blog section:
- Go to Storefront > Theme > Customize > Theme Styles > Home Page > Scroll down.
- Enter your desired subtitle in the “Blog Subtitle” field.
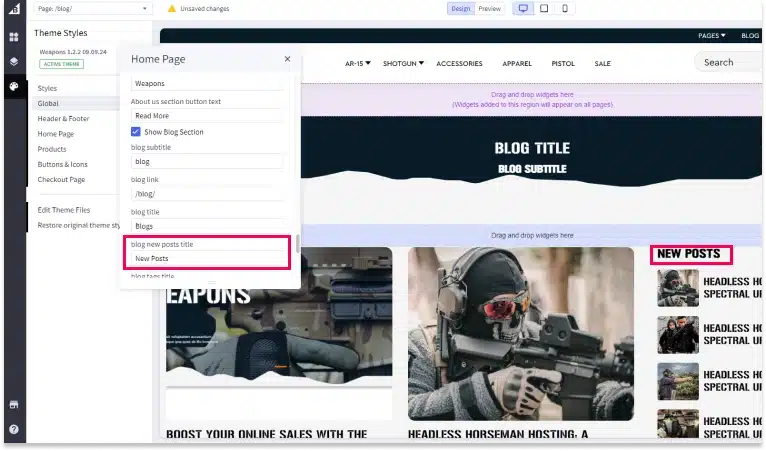
Blog New Posts Title
To set the title for the “New Posts” section:
- Go to Storefront > Theme > Customize > Theme Styles > Home Page > Scroll down.
- Enter your desired title in the “Blog New Posts Title” field.
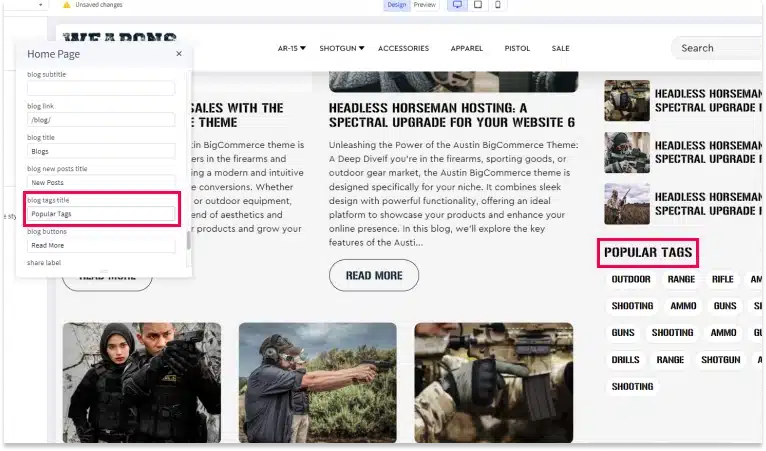
Blog Tags Title
To set the title for the Blog Tags section:
- Go to Storefront > Theme > Customize > Theme Styles > Home Page > Scroll down.
- Enter your desired title in the “Blog Tags Title” field.
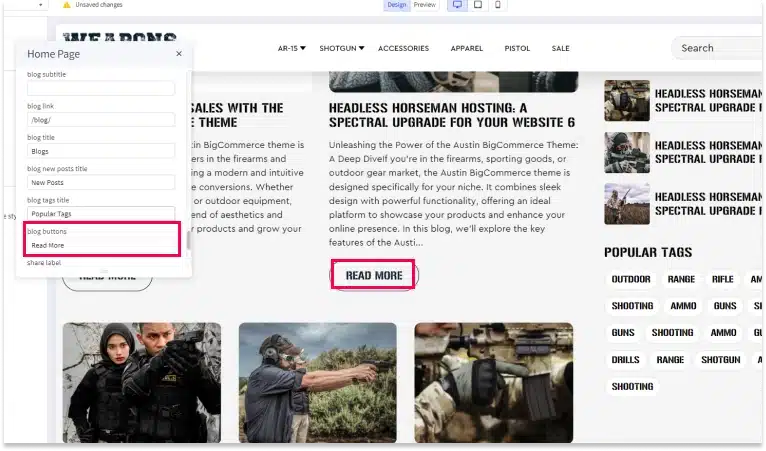
Blog Buttons
To customize the buttons for your Blog section:
- Go to Storefront > Theme > Customize > Theme Styles > Home Page > Scroll down.
- Enter the label for the buttons in the “Blog Buttons” field.
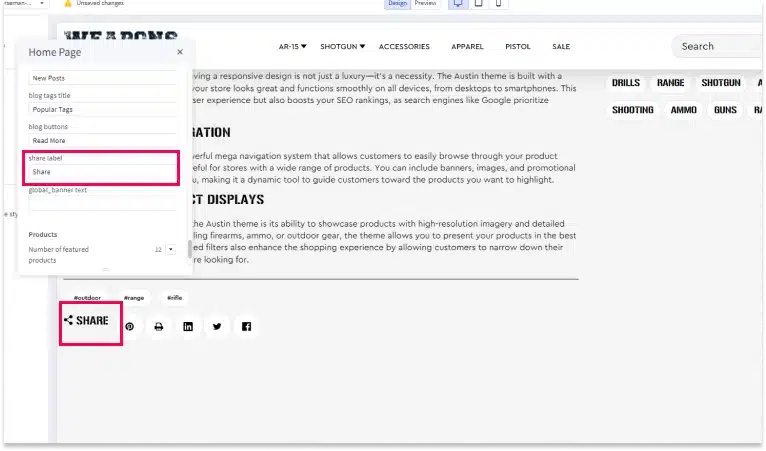
Share Label
To customize the label for the social share buttons:
- Go to Storefront > Theme > Customize > Theme Styles > Home Page > Scroll down.
- Enter your desired share label in the “Share Label” field (e.g., “Share This Post”).
Save and Publish
After making all your settings changes, be sure to save your theme and publish it to apply the changes to your live site.
